Tuesday, December 27, 2011

Peanut butter M&M cookies for Felix

We're off to see our friend Felix tomorrow, and his mum is offering lunch with our playdate.  I offered to bring something, and she suggested dessert.  Not a problem!
We haven't been shopping since the weekend before last, as we found many years ago that shopping weekly worked for us, and have a list on the fridge for additions throughout the week.  So with regard to what to bake and bring, it necessitated a quick scour of the ingredients and dredge of the memory to figure it out.  And cookies won!
The recipe is scribbled on a torn back of orange envelope and stuck into a blue book - seriously.  My friend Catherine copied it out of her Guardian weekend supplement many years ago, once we'd successfully made it with our then just-turned-two year old Mini-1's.  It's a quick, easy and basic recipe using flour, baking powder, two sugars, a bit of butter and roughly 100g of 'extras' - in this evening's case they were M&M's and a spoonful of crunchy peanut butter.  Other times they've been chopped apricots, oats, choc chips, lemon zest etc etc.
I had checked with the girls earlier in the day to see if they wanted to help make them, but both said no, because they didn't want to share them!  Not very charitable at all, and not the way we'd like them to think.  Suffice it to say, I started baking once they were in bed/asleep.
And a mere hour later (most of which time was taken up with 4-5 batches at 9 minutes each) we have the delight that is nearly 4 dozen small coloured-dot-studded cookies - yummy!

Friday, December 23, 2011

Christmas cupcakes, anyone?

My offer had been to do Vanilla and Red Velvet for Christmas - because I had thought it would look nice, but unfortunately I had a lot of trouble tracking down one particular odd ingredient for the Red's.  Who'da thought it'd be such a bother?  We went to 6 stores in the end, with the kids being really quite good and patient while we searched for this elusive ingredient - but no luck.
I had been in touch with the customers by email or Facebook message only - I hadn't thought to take a phone number.  So I quickly messaged them with the problem, to check if all Vanilla would be ok.  Some got in touch faster than others, so I just bit the bullet and did them all Vanilla.

And boxed up some, ready to go...

Here's hoping they love them, and of course - Merry Christmas 2011

Wednesday, December 21, 2011

Christmas at school, Becca style

I felt quite pleased to be asked by Mini-1's school to provide brownies for the adults to nibble with their tea/coffee after the Carol Concert (which was held before the Christmas Fayre).  To be fair, it's a fairly small school so I knew it was an achieveable request, and offered to do 2 trays and cut them into bite-size pieces so they'd be a) manageable and b) go further.  Mini-2 and I arrived after the concert, but just before the fayre started and were thrilled to be greeted by many parents, (some of whom we didn't even know) congratulating us on the delicious brownies!  No idea how they knew I made them, but very pleased nonetheless. 
Then it was the turn of the class party.  I had considered offering to bake mini cupcakes for the class, but knew it wasn't officially sanctioned by the Scottish Government (not conducive to the Healthy Eating in School (or elsewhere, for that matter) Policy) and so the Education Dept didn't allow it.  But then the class teacher shyly asked if I could.  Sure of course, I said, but I couldn't make as few as 16 - could she pass out the rest?  Oh yes, was the quick reply.  And thus it was that I handed in 4 dozen similarly decorated little Christmas beauties.


And I'm pleased to say that these too got great reviews!

Wednesday, December 14, 2011

A wee birthday treat

I posted a photo on our Facebook page showing what we could do for Christmas gift ideas, and was lucky enough to get a request or two out of it - yippee!
The first lady wanted a box of 4 Vanilla cupcakes with vanilla buttercream icing - which of course meant birthday glitter!  I used mini red and pink hearts, a wafer flower and gold glitter, black and white crispy balls and neon pink glitter with chocolate hearts. 
We love birthdays at Becca Bakes, thanks for letting us help you celebrate Merry!

Sunday, December 11, 2011

Giant 19th birthday

The daughter of a friend was turning 19, and her mother had requested a giant cupcake in red/white/pink with bows for her some months ago - knowing Sammi would love it.  Hence the practice one a month or so ago, to get the recipe right and work out icing techniques and so on. 
Collection was set for Sunday lunchtime, so I would usually  have baked Friday night, decorated Saturday night but as it was a Friday night, Mr Becca was in the kitchen.  No bother, I woke up a little bit early (weekends usually mean a lie till around 815am, woo hoo) and baked Saturday morning.  This would still give a fresh cake, but also allow it time to cool fully before icing and setting.  We were off out to a friend's half-way across the country (weeeell, not technically but a good hour or so away, and our country is kinda small) for lunch, so time was of the essence.
So to Saturday night.  I had found YouTube videos for making bows out of fondant (I really liked this one, because she made it look so easy) but it wasn't. 
As you can see, the bows I made look nothing like the one the girl made, but with enough practice I think I could nearly do it.  Or I could save myself the bother, and buy some ready-made by an expert off eBay ;)
I had Googled giant cupcakes to see how others decorated them, as I felt the rose style swirls looked great and wanted to see how other bakers placed them around the cake.  That done, I did my best.  And feel that I could do better.  Still, it turned out well and Sammi and her mum were thrilled with it. 
The last one I had made was too tall for any carrier I owned, however I was lucky enough to find a long roll of cellophane and used this to wrap the cake for transport, thus...
 Not ideal, but not bad.  And it survived the car ride home, so all's well that ends well.

Saturday, December 03, 2011

Honey Joys

So, Saturday morning's chez Becca.  We're all in our jammies, watching cartoons after breakfast while Daddy sleeps on after his epic Friday Night cooking session.  The girls didn't fancy cornflakes for breakfast, and we have a lot to eat, as the box was large and had been opened.  Mummy's youth to the rescue!  I remembered a recipe I used to make with my Mum (and probably my siblings too) years ago that was fun and delicious, and cut out of the side of a packet of cornflakes - Honey Joys.  Basically, honey and cornflakes baked for a few minutes.  Mmmm...
Again there was a slight (correctable) issue with the reading of the recipe - as it's an Australian recipe, their tablespoon is actually 20ml whereas the British one is only 15ml.  No worries mate, as the Aussies say.  And the best bit about all this was that Mini-1 wanted to help!  Yey, she's not usually home when Mini-2 and I tend to bake and is getting bored of cake and cupcakes, so this was news indeed.
 The recipe - as you can see, I wasn't joking.  It really is cut out of the side of the packet, ha ha.

As suspected, these didn't last long at all.  And with their festive foil cases, we had to try one of each colour to see how the taste compared.  Weeeeeeell, any excuse for more treats!

Friday, December 02, 2011

Christmas chez Becca

I hadn't baked Red Velvet anything in a while, and was thinking of doing it for our own Christmas lunch (as no-one but Mr Becca actually likes fruit cake, of any variety) so did some cupcakes.  A colleague of Mr Becca's had got in touch earlier in the week, and asked if I could do 3 dozen cupcakes for them.  Sure thing!  We agreed on a mix of vanilla and red velvet (see how I snuck that in there?) and how and when I'd deliver them, then off I went.  I boxed some up and put a photo on the Facebook page, in the hopes that someone may be encouraged to purchase some, then boxed up a dozen for one office and the rest for the other. Enjoy.


Merry Christmas dear readers!

Wednesday, November 30, 2011

Mini pumpkin pies, better late than never

Before I got around to the actual baking and cooking, I had had great plans for things to bring to Thanksgiving dinner.  These mini pumpkin pies were one of the items I planned to make, but after reading (incorrectly, as it turned out) through the recipe, I felt that the dozen it would supply wouldn't be enough so didn't do them.
I had the time a few days later, and started by cooking the pumpkin and so forth.  I rolled out my sheet of room-temperature shortcrust pastry (you didn't think I was going to attempt making my own pastry, did you?  Thanks for the vote of confidence, but not yet) and stamped out as many circles as I could.  After filling them with mix, I couldn't figure out why they were so full and I still had loads of mix left?!
So I read and re-read the recipe, and then discovered that I had bought a 375g packet of pastry, and the recipe required 500g.  Aha, problem solved.  But what to do with the extra mix?  Nah, we couldn't figure that one out either... The pies baked up really well, and tasted very American.  Which is to say, sweet and gently spiced and not at all like we expected - good but different.  So I won't be making these for us again in a hurry, ha ha.

Tuesday, November 29, 2011

Cake Club 2, buttercream icing

We had so much fun last time, that we wanted to do it again, this time at H's house.  She had learned her icing and decoration skills when working for the American Ambassador in Fiji way back when - it's the way his wife spent her Saturdays.  As you do, ha ha.  Lucky us, we got to learn her skills too. 
We each baked a cake and brought it along uniced, however mine was iced because I wanted to learn how to do a character cake.  Here is the table H had prepped for our arrival, and I'll show you the cakes in turn too.
She had laid out her large set of Wilton icing nozzles, her old but faithful Wilton icing colour set, a ruler, disposable and re-useable piping bags, a Wilton angled spatula and I can't recall what else.  And before you wonder, no I don't have a deal with Amazon or Wilton, but I thought these links would let you see exactly what I mean.
So here, in no particular order, are the cakes we baked and all took turns in icing. Yep, that's right - we each took turns icing sections of each cake, so that we could practice the skills and correct any mistakes. So you'll notice that the icing isn't tidy and uniform all the way around the cakes. Sorry.
We practiced using a flat line nozzle that was serrated on one side, and using a coupler with the nozzle so you could change colours and bags easily.
 Now we tried shell borders, with mixed success.
And finally, we tried buttercream roses and two types of leaf nozzle.  It's kind of pretty, right?  ha ha.
Here we're learning to do a transfer onto the cake of a character, using a pin to prick out the shape.  Then you fill it in with a fine writing nozzle, and then use a closed star nozzle (sorry, but I don't own either of these types of nozzle so can't tell you the number.  Perhaps if H reads this blog, she could comment below with the correct nozzle numbers...) to fill in the shape.  It's not a great rendition of Mickey Mouse's head, but it's recognisable.

And here too we have the addition of buttercream roses and leaves.  They'll appear on pretty much every cake, as we were excited to do something different and new, and were pleased with our efforts.
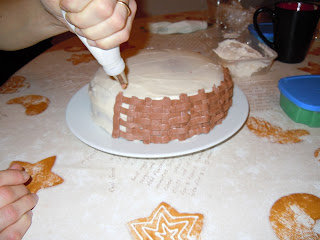
Here we are learning basketweave icing.  It looks impressive when done neatly and consistently, and we all tried really hard to make it work, ha ha.
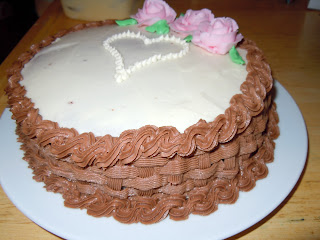
From this angle you can see we also learned the rope border technique, and used a press (to make the dots like the pinprick technique showed us) to show the shape over which to use a writing nozzle to make the dots for the heart.  And, of course, the ever-present roses and leaves.
Do you think it looks a bit like a rattan basket??
With this cake, the baker learnt how to ice around corners, and is going to stick to round cakes from now on. We also practiced with the serrated lines, and another style of press but using lilac icing this time.
Here we practiced shell borders again. 
This one was fun, and hard to do wrong.  Called Cornelli Lace, the idea is to wiggle about with a writing nozzle and fill up the space without letting the lines touch or cross over.  We all had a try, then did some shell borders.  Then, as it was a school night and getting ever closer to midnight, we called it a night.  However, the next morning our hostess H and her young daughter 'fixed' the cake and added a princess and some pink...

Thursday, November 24, 2011

Thanksgiving

We are lucky enough to have friends from many countries here and today it is Thanksgiving in the USA.  Our friend Jill is from Virginia and loves the holidays (hers was the 4th of July party we attended a few months ago) and has invited us around again to celebrate Thanksgiving.  It was originally a festival to celebrate a bountiful harvest, and judging by the menu she has on offer, it sure will be a bountiful feast!  She's got an enormous turkey (already in the oven I believe) and is making sweet potato mash, pumpkin pie, lots of veg, and so on and so forth.
As is tradition, guests bring a dish too and I've checked with the boss/hostess and have made Cornbread (because I really enjoyed hers last year) plus a cake and some Rocky Road for dessert.  I know that pie is the traditional dessert - especially pumpkin or apple - but I'm not great at pastry/pies as yet.  There's no time like the present, as the saying goes, but time was of the essence and I didn't want to risk a mistake and necessitate a re-bake at the last minute.
So, Cornbread.  I found a recipe at Goodtoknow recipes and got together all the ingredients.  Polenta flour wasn't available at the first store I tried, so I asked Mr Becca if he knew where I may find some.  'Above the stove, in the pasta cupboard', he said.  How very handy, ha ha.  This was really easy to make, and had they been home at the time the girls could easily have helped with all aspects.  It baked up really well, and seemed done at the appointed time.  I cut it up and popped it into the cake tin, to take to Jill's and only tried a few pieces, honest...
The little bits you see are spring onion and red chilli flakes.
Next on to the cake - Lemon & Cream cheese.  This recipe was from a Facebook page called Fans of Cake Baker, which is a lovely community page of home and professional bakers who are kind and helpful with any query you may have.  This cake sounded light and perfect for after a heavy meal, needing as it did the zest of 3 large lemons plus some juice.
It too was easy to make but took ages to bake - 1hour 35mins at 150c.  I couldn't decide how to ice and decorate it, switching between thinking lemon buttercream and lemon cream cheese icing.  Then felt that a simple dusting of icing sugar and neon orange edible glitter would be ideal.
I had wanted to make some Mini pumpkin pies or Pumpkin and Feta filo triangles, both also from Goodtoknow recipes, and even bought a beauty of a butternut squash but felt that they wouldn't supply enough of each to feed the guests.  Another time...  So after checking again with the boss, I made some Rocky Road, sprinkling it with the same neon orange glitter.  After all, if it's from Becca Bakes, it's gotta have glitter!
Most odd, the glitter is blatantly orange in the jar, but seems to have lots of green and some gold in it?  Sorry, perhaps if I were a better photographer?

Saturday, November 19, 2011

Pumpkin, in a cupcake?

You may have gathered by now that I'm not a born-and-bred Scot, but rather an honourary one by virtue of the amount of time we've lived here.  And in the land of milk and honey where I was raised (but interestingly, not born) I don't recall us ever eating pumpkin.  Certainly Halloween and Thanksgiving weren't celebrated.  Suffice it to say, I love butternut squash and so did the girls when younger.  I bought a lovely-looking one and then toyed with the idea of serving it to them with pasta, creme fraiche and herbs for dinner.  Or in cupcakes for afternoon tea.  Guess what won?
I found just the recipe I wanted in the first Hummingbird book, read it over, and got to work.  These were pretty much like vanilla cupcakes but with mashed pumpkin and cinnamon added, and buttercream icing.  As such they were really  moist (note to self, make them taller next time) and lasted well.  Or they would have, if they didn't get eaten so quickly.

Friday, November 18, 2011

Chocolate Fudge

Mr Becca likes fudge, and I'd found what seemed like an easy recipe by Lorraine Pascale when checking for recipes after watching an episode of her latest series.  We checked, bought some evaporated milk, then got down to business after the school run (walk).  We had a friend-of-Mini-2 coming to play about 10am so only had a wee while...
After melting the starter ingredients, we added in marshmallows and melted them through.  Mini-2 was really keen to help so I carefully let her mix the marshmallows in.  The pan was hot, the mix was hot and of course, the stove was hot, so she was very highly supervised at this point. 
I didn't have quite enough time to finely chop all the required chocolate so we broke it down then put it all into the hot mix to melt.  Not a problem as it happened, it melted easily.  Then it all set quite quickly as it was poured into the tray - I didn't expect that or I would have tried to make it flatter somehow.
The recipe recommended cutting it into 25 squares but they seemed a bit big to me, so I got 36 out of it instead.  We had some after lunch, then I took some to a couple of nursery parents.  Mr Becca and Mini-1 tried it when they got home and pronounced it good but sweet.  Mr Becca then decided that he preferred plain fudge, thanks.
I took the remainder in to Toddlers this morning and it was all gone in minutes - that's more like it!!  Glad you enjoyed it ladies ;)

Sunday, November 13, 2011

Uncle Sam needs you!

A lady was due to emigrate to the gool ole US of A, and was excited but also sad to leave her family and friends behind here in bonnie Scotland.  So her lovely daughter-in-law reqeusted a cake that would help make her happy, an American flag.  We looked at a couple of images, discussed ideas and this is how it all panned out. 
I thought it would be fun if, when they cut into the cake, it was coloured appropriately, so started out like this - one blue half, one red.  Once baked, the tops were sliced to flatten the cakes for layering with jam and buttercream and crumb-coated.  I saw this on one of the YouTube videos and am embarrassed to admit that it was news to me.  But no more!  It's basically where you coat the cake in a slightly thinner than usual layer of buttercream so that it catches all the crumbs, then after you cover it in buttercream or fondant.  Here's a photo of what I mean.
It's not pretty, but it is a foundation.  You can see that I'd tried to smooth the edges so that the next layer would lay well, in theory anyway.  I cut out the stars and couldn't decide whether to use small or large ones, so cut out both...
In the end I went for the large ones, and laid them onto blue fondant.  I did the stripes in Fruit Winders, which ended up a bit wobbly. Sorry.
The customer reviews were positive, phew!  "Thank you so much :) they both loved it! Looked Amazing, tasted amazing!" from the daughter-in-law and "Thanks Becca. Great cake! Really delicious. Thanks to our family party co-ordinator too for organising it! :) " from the lady herself.  They even took an interior shot for us, awww.

Wednesday, November 09, 2011

Cake Club 1, fondant icing

Now, I know that the first rule of Fight Club was that you didn't talk about Fight Club.  That obviously won't work in a blog situation though, so I won't talk too much, but will show you some photos of what we did.  We're basically just having fun and practicing techniques and passing on knowledge. 
Here we have M, with her mini marzipanned fruit cake.  She covered it in white fondant, and is rolling out shapes to make little robins having a snowball fight.  This cake is for sale at her son's playgroup fundraiser.
 M's finished product.  She's even done tiny feet for the one who got knocked over - too cute!
Here we see P cutting off her excess fondant with a pizza cutter.  We found this to be much easier than a knife, so H and I used it too.  P's cake isn't for anything in particular, she was just practicing her skills.
P trying to get smoother sides.  Someone passed her the plastic smoothing tool after this photo.  It really helps you to get a very smooth finish, you just have to be a bit careful that you don't push too hard and indent your cake.
P had a white powder, that had an E number for a name, and it's meant to be added to fondant/sugarpaste to make it more like flower paste (i.e. you can roll thinner and the item keeps its shape).  She decided to try it out on a butterfly or two, and left them to dry in a book to give them a lifted appearance.
P impressed us all with her flowers, and they look great with the butterflies. Then she saw the green colour that H had made, so added in some falling ivy...
Next we see what H did.  To my surprise, H had never used fondant icing before (I was sure we'd talked about it, but was obviously mistaken).  She was keen to use colour and shapes/cutters and decided to try a garden sort of a theme.  Again, her cake wasn't for a reason, but simply to practice on.
We had an old Wilton Yearbook and we all went through it for inspiration (none struck for me, as you'll see below) and H went for the garden idea.  M had done grass before, and suggested H cut into fondant in mismatched long skinny triangles, but she was finding that quite tricky to master.  This idea worked a lot easier, and she simply used a toothpick to press in the lines.  The grass sections were stuck on by moistening the back with a touch of water.  Then she went crazy with the flower cutters and food colours...   Lovely!
And finally we get to me.  Once you've seen it, you'll think I shouldn't have bothered.  Sorry.  Please keep reading, pretty please?  I had done Mini-2's birthday cake and had a bit of an issue with the rolled out fondant not being fully circular and thus not being quite smooth enough.  So we talked over possible fixes and I went for it.
This time the rolling out/smoothing etc went much better.  The only issue is that I came without any real idea of what I wanted to do, so ended up doing nothing much.  I haphazardly slapped on the leaves on the sides, and then wished I'd got down to eye level to do them in a clock formation, so they would have been more even.  I found the Gerbera flower cutter quite tricky to use effectively, even though it was the push-out style.  And M's gold dust wasn't as successful for me as my edible glitter usually is.
So in summary, we all had a great night, learnt new skills and have already booked in our next meeting and decided to do buttercream.  I think subsequent club nights may need to be decorated cookie related, and what else do you think??